Thank you for choosing Agile’s ConnectLink™ SalesForce integration application. These instructions should encompass everything you need to get started, but if questions arise at any time, please contact your Agile Account Manager or email [email protected] for additional support.
Action: Prior to starting the installation, please follow the steps in the AgileInsight Match page to begin the matching process.
Because contacts in schools or districts often have multiple roles and can be assigned to multiple buildings; Agile has chosen to utilize the standard “Related Account/Contacts Object” to avoid the creation of duplicate contacts. Before installation, this package requires that the “Allow users to relate a contact to multiple account” setting to be enabled – which is off by default. If it’s already enabled, you can skip to Step 2 below.
To Enable the Related Account/Contact object you need to go to the “Account Settings” in the setup menu. See the screenshot to the right:
Note: Enabling this setting may take a while. A related list for both contacts and account will be enabled and for any contact related to an account a related contact record will be created. These records are required by the app as they do not take any additional storage space and allow educators (contacts) to be related to as many institutions (accounts) as necessary.
Once the app is downloaded, you will need to complete the ConnectLink Setup to access your licensed data from the Agile database through ConnectLink. You will need your Client ID and Client Key provided to you by your Agile Account Manager.
In ConnectLink Setup, add your credentials (the Client ID and Client Key). Click Save.
Next under Actions, click “Update License Data” to retrieve the fields associated with your data license. You will also need to click “Update License Data” anytime changes are made to your data license.
During the installation process, several fields were added to your Salesforce subscription as custom fields.
The added account fields include:
Created by ConnectLink
ConnectLink Key
ConnectLink Last Sync Date
ConnectLink Parent Key
ConnectLink Status
ConnectLink Do Not Update
ConnectLink Do Not Update Hierarchy
The added contact fields include:
Created by ConnectLink
ConnectLink Key
ConnectLink Last Sync Date
ConnectLink Status
ConnectLink Do Not Update
ConnectLink Do Not Update Hierarchy
ConnectLink Email Hard Bounce
The added lead fields include:
Created by ConnectLink
ConnectLink Key
ConnectLink Last Sync Date
ConnectLink Status
ConnectLink Do Not Update
ConnectLink Do Not Update Hierarchy
ConnectLink Email Hard Bounce
The added related account/contact fields include:
ConnectLink Inactive Roles
ConnectLink Roles
Note: You’ll need to add the above fields to their respective layouts in Salesforce to support the ConnectLink integration. The ConnectLink Sync, ConnectLink Matching, and Report CL Data Problem custom buttons should be added to the account, contact, and lead layouts as well.
Add Related Contacts to the Account layout to see the positions that the contacts associated with the Account have, you need to add the related list to your layout and add the ConnectLink Roles/ConnectLink Inactive Roles fields to the list.
Repeat this process, adding Related Accounts to the contact layout.
You will need to ensure your license for Salesforce allows for the amount of data licensed from Agile. Use this formula as a guideline on how much storage is required.
A = Number of Account C = Number of Contacts O = Number of Objects
A + C = O
O x 2 KB = Number of KB needed to accommodate the new data
Note: The application will only import a portion of the additional data if there is insufficient storage available.
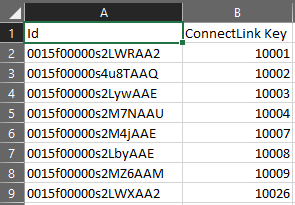
At any time prior to running a sync or Bulk Update, you can load the data returned to you from the AgileInsight Match into Salesforce. All you need to do is load the ConnectLink Key into your existing Accounts and Contacts, using your Salesforce ID as your identifier.
Any accounts and contacts that are added to your Salesforce environment through ConnectLink are flagged as an Agile record by checking the Created by ConnectLink checkbox. This helps you comply with the Agile purge requirements at the end of the contract term if you choose not to continue with your data license. Please refer to your contract terms and conditions for more information.
Review the data fields you have received from Agile and add any custom fields to your Salesforce layout that you’d like to have displayed. Ensure that you are using the correct data type for the field, otherwise the application will produce an error. Use the Agile Data Dictionary to match the Agile data type with the Salesforce data type. Note: add Agile percentage fields as number fields in Salesforce.
At this point, you’ll need to perform the field mappings in the ConnectLink Setup. When the preference is set to “Agile Ed” or “Choose Agile Ed” the Agile data is preferred over the current information in Salesforce. For individual account or contact updates, the “Choose” option allows the individual user to select from the two options and determine whether to overwrite the existing Salesforce data with the Agile data. For bulk updates the “Choose” option is ignored. For “Salesforce” and “Choose Salesforce” the Agile data is used only to fill empty fields. The “Choose” option is only available for single record updates.
Note: A single Agile data select can be mapped to more than one Salesforce field. For example, some clients choose to map the Agile email address to the standard Salesforce email field with the preference set to Salesforce and will again map the Agile email address to a secondary Salesforce email field with the preference set to AgileEd.
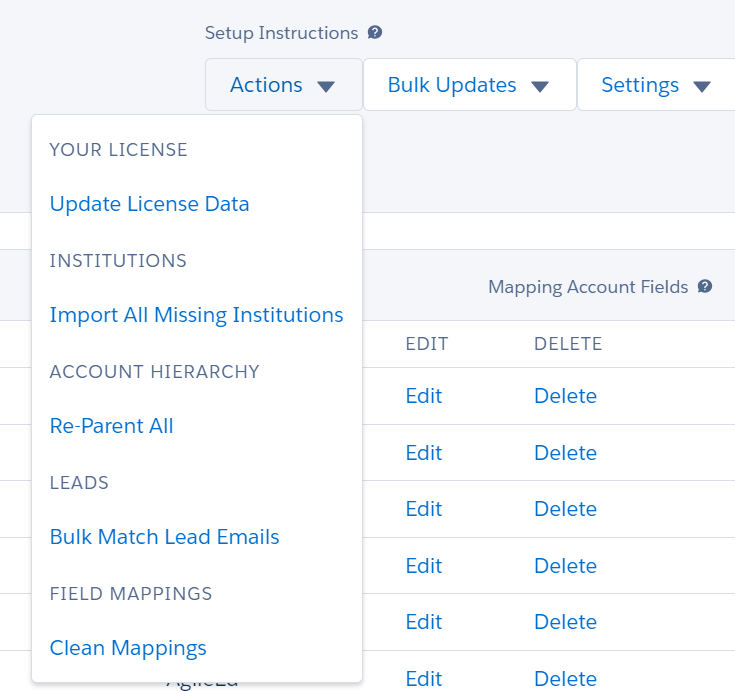
After creating your field mappings, use the Actions and Settings menus to configure your data flow.
Update License Data: Updates the fields available for mapping.
Import All Missing Institutions: Imports institutions within your data license that do not currently exist in your org.
Bulk Match Lead Emails: Goes over all existing leads that do not have ConnectLink Keys and attempts to set a key to them via an exact match on email.
New Educator Records: Determines whether new contacts (and/or leads) are imported with updates or if only existing contacts (and/or leads) get updated.
Match Educator Records on Email: Allows the application to match contact or lead records where a ConnectLink Key is not present and append the key. Note: The standard contact/lead email fields need to be mapped in order for this setting to work. Preference can be set to Salesforce.
Enable Leads: Enables the sync(s) to update leads as well as allow for new educator records to be created as leads.
Import Orphaned Leads: Batch job that imports leads that do not belong to any accounts that are currently in the system (will not create accounts, will create leads with no account attached).
Import New Educators as: Determine whether the app imports educators as Leads or Contacts.
After you have mapped all fields and configured your settings, you are able to update your Salesforce CRM from Agile’s database by clicking on the “ConnectLink Sync” button for individual account. Update an individual account in Salesforce using the ConnectLink Sync button to ensure that your mapped fields display properly, and the update occurs without error.
Congratulations, you have completed the setup for your ConnectLink integration. Optionally, you can choose to import all missing institutions (limited to your data license) by clicking “Import All Missing Institutions” from the Actions menu on the ConnectLink Setup tab. Next, click “Bulk Update All” to force update all records with the mapped data. Then schedule ongoing weekly Bulk Updates. See the Scheduling Bulk Updates page for instructions. Note: must schedule SchedulableMetrics or run Update Dashboards in order for ConnectLink Dashboards to display.
We use cookies to give you the best online experience. Cookies keep our site secure and reliable. They allow us to personalize agile-ed.com to you and help us analyze how the site is used.